
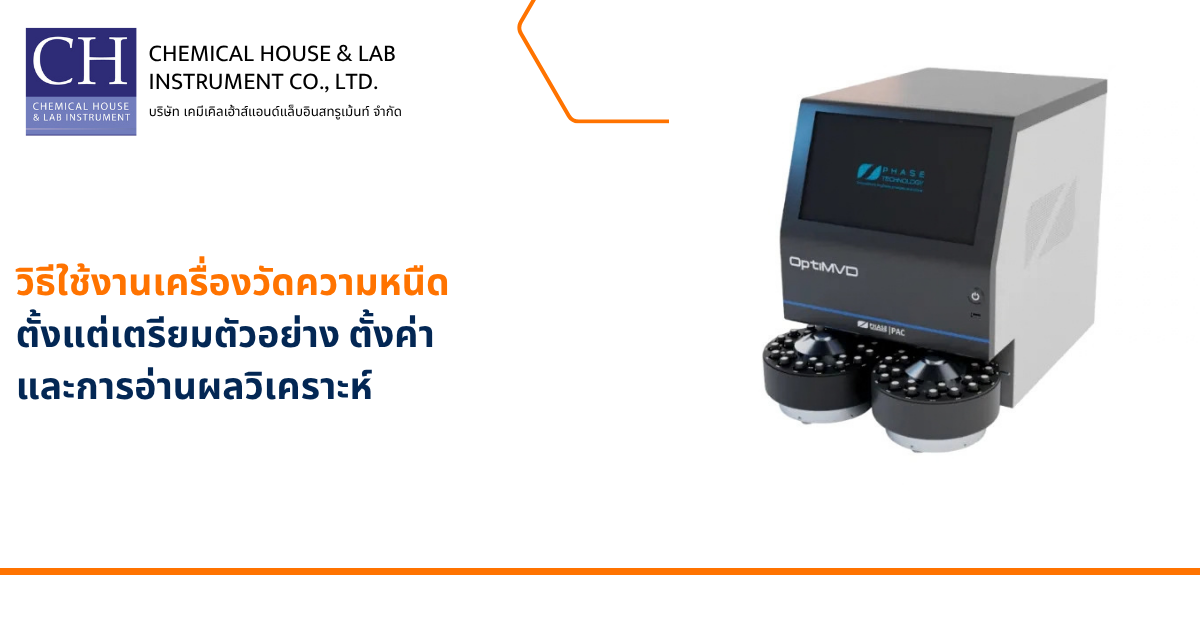
To test one sample with a viscometer, prepare and seal the vial, place it in the carousel position that matches the position selected on the screen, set the test temperature, and start the run. Once the test is complete, check the kinematic viscosity and density results together with their reported temperatures. Review any symbols that may affect how you interpret the results.
This guide walks through the process for the OptiMVD-AS2, from checking that the instrument is ready to reading the completed test results.
Chemical House & Lab Instrument supplies viscometers for laboratories in the oil, refining, and chemical industries, as well as commercial testing laboratories.
Check the Instrument Before Loading a Sample
After switching on the instrument, wait for the System Check to pass. Then look at the status bars for Viscometers A and B. Green means the instrument is ready to test, yellow means it is in use, and red indicates an error during operation. A test cannot begin if the System Check has not passed.

Make sure you have a new vial and sealing components for the sample. Check that the solvent system is ready and that the waste bottle has enough capacity for the test. Before setting up the run, confirm the temperature at which the sample’s KV must be measured. You will need to compare the result with a specification stated at the same temperature.
Prepare and Seal the Sample Vial
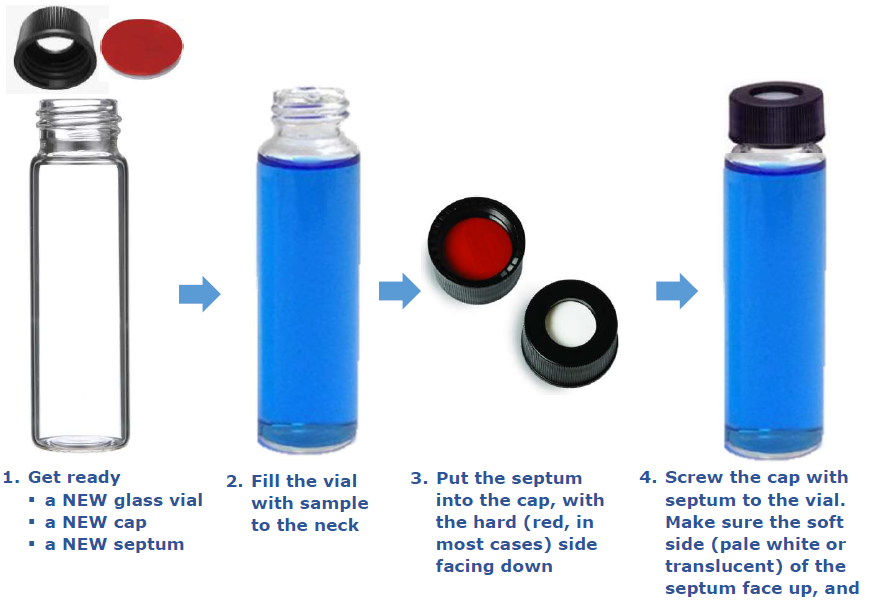
Use a new glass vial, cap, and septum for each sample. Fill the vial to its neck. Place the septum inside the cap with its hard side facing down and its soft side facing up, then screw the cap firmly onto the vial.
Check the septum’s orientation before closing the vial. According to the instrument manual, reusing a septum may prevent the instrument from loading the sample or allow debris to enter the instrument.
Place the Vial in the Carousel and Select Its Position
Place the vial in Carousel A or Carousel B, then open the TEST SETUP page. If you are using Carousel B, select it on the screen so that it becomes the Active Carousel. Next, select the on-screen position number that matches the vial’s physical position. A green ring appears around the selected position.
Some carousel positions are located beneath the instrument screen. If you need to rotate a carousel to reach one, use the rotation buttons on the screen. Do not turn the carousel by hand. Before continuing, compare the position number on the instrument with the one selected on the screen, especially when there are samples in both carousels.
Set Up the Sample on the PROGRAM VIAL Page
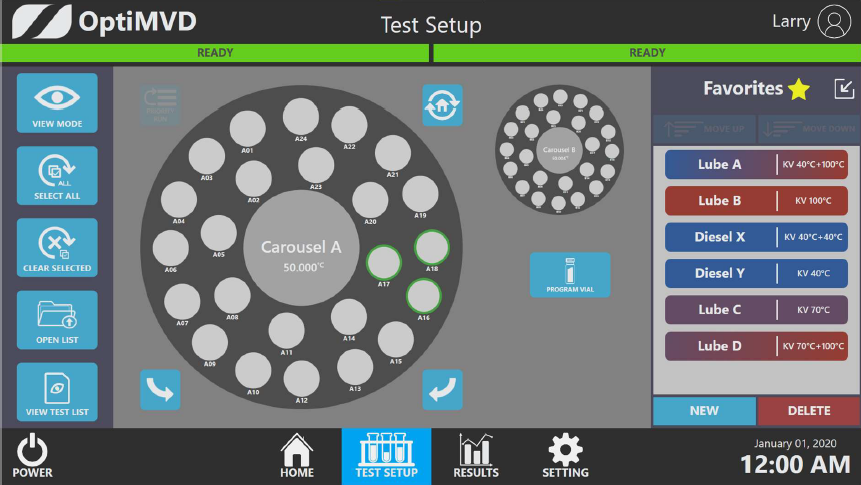
After selecting the vial position, press PROGRAM VIAL to enter the test information for that position.
Enter the Sample Details and Select the Test Temperature
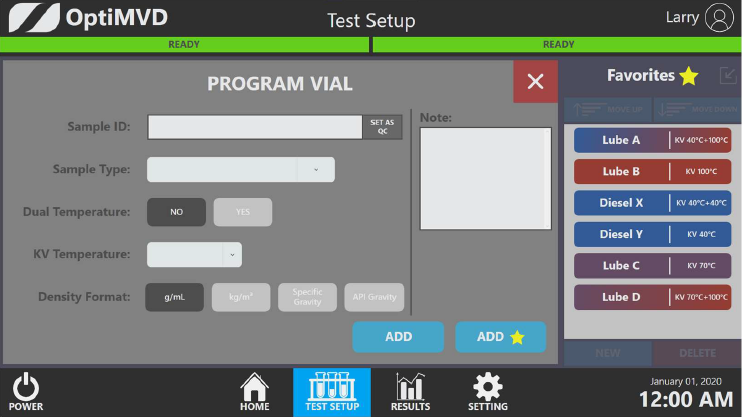
Check the following fields:
- Sample ID: The identifier used to recognize the sample and find its result later.
- Sample Type: The sample category selected from the instrument’s list.
- KV Temperature: The temperature at which kinematic viscosity will be measured.
- Density format: The format or unit used to display density.
- Note: Optional information about the test.
Choose a KV Temperature that matches the test method or specification you will use to assess the result. Density format controls how the density value is displayed; it does not set the density reporting temperature.
Set Up a Test at One or Two Temperatures
If you need a KV result at one temperature, select the required temperature for a single test. If you need results at two temperatures from the same vial, select Dual Temperature and set the KV Temperature for both viscometers according to your test requirements.
For example, a laboratory may need results at 40°C and 100°C. When a Dual Temperature test uses two different temperatures, the instrument also calculates and displays the Viscosity Index (VI). Using both viscometers at the same temperature does not produce a VI result under this condition.
Review the Programmed Samples and Start the Test
After entering the information on the PROGRAM VIAL page, press ADD to assign the settings to the selected vial position. Check that the Sample ID, position number, and temperature shown on the screen match the physical sample.
Before pressing START RUN, review the programmed positions in both Carousel A and Carousel B, even if you intend to test only one vial. START RUN begins the tests for programmed vials in both carousels. Once the run starts, the HOME page shows the sample being tested, the run order, and its progress.
Read and Use the Test Results
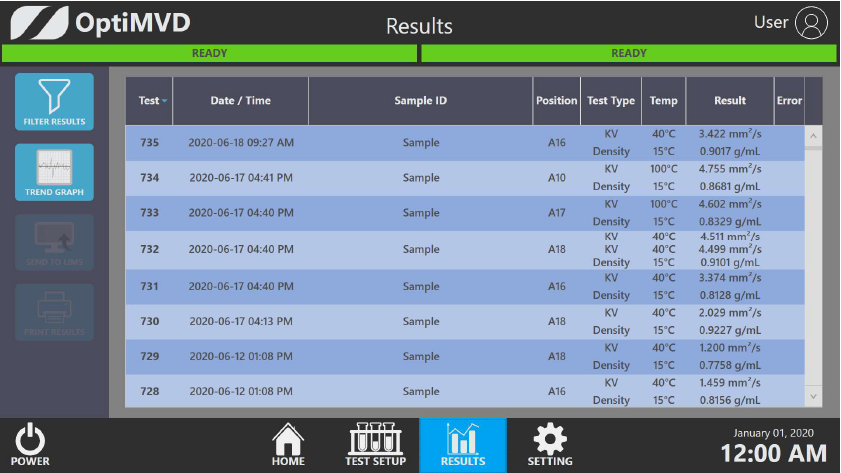
When the test is complete, open the RESULTS page. Use the Sample ID and vial position to find the result for the correct sample.
Read KV and Density Alongside Their Test Conditions
The RESULTS page shows the KV result at its test temperature and the density result at its reporting temperature. If you ran a Dual Temperature test at two different temperatures, check the VI result as well.
When comparing KV with a QC specification, check both the unit and temperature. For example, compare a result measured at 40°C with a specification stated at 40°C. For density, check its reported temperature separately; do not assume it is the same as the KV test temperature.
Check Result Symbols and Detailed Results
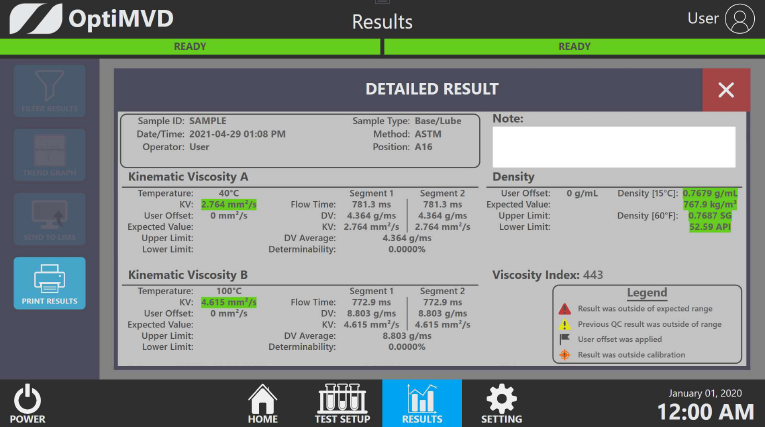
To see more than the results table, tap a result once to select it, then tap it again to open Detailed Results. This view includes supporting KV information, such as the test temperature and results for individual measurement segments, as well as density values in different formats.
Check any symbols displayed beside the result before using it. A limit warning indicates that a value is outside the limits configured for that sample. An outside-calibration symbol indicates that a result falls outside the range covered by the calibration standards. These symbols describe different issues and should be assessed according to your laboratory’s procedures.